July 17, 2013

Finding the Right Home for Us

(previously shared on my old family blog, but wanted to share it here as well...)

The plan was to live on Louise Street for five years. Five turned into eight very quickly, and last spring we seriously started the home search. We had a very specific type of home we were looking for, and as long as it was in West Michigan and under 25 miles to Greg's work, we went to look at it.

There was a long list of "wants", and a short list of "must-haves", but basically, after looking at new homes, we decided we wanted a classic mid-century modern (MCM) home with some fun intact details from previous decades.

Our "must-have" list included...

  • good school district
  • great room instead of separate living, dining & kitchen
  • outdoor living space
  • ranch 
  • more than one bathroom
Because our "want" list was quite long, so we just considered those "bonuses" if the houses had them. This list included...
  • tons of windows
  • natural stone or brick used on façade and interior
  • fireplace
  • walk out basement
  • two+ stall garage
  • quiet neighborhood
  • main floor laundry
  • large yard
  • space to add a second garage
  • separate office space
  • and this list goes on and on...it's a dream list, I suppose!

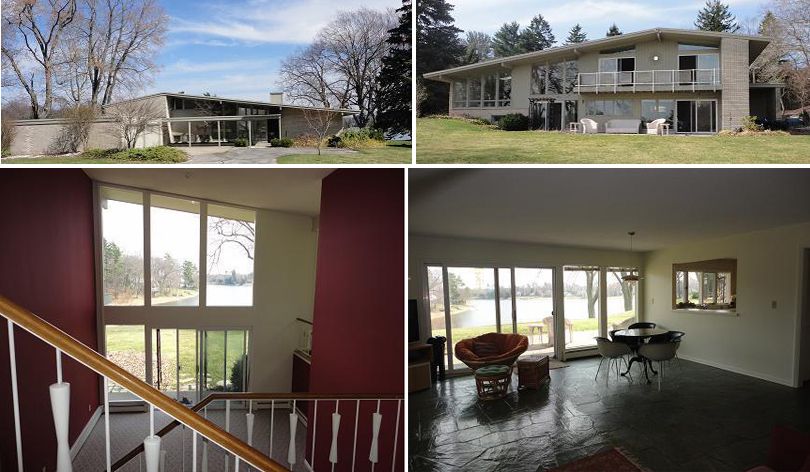
We started the search April 2012, and we came across the first property we were really interested in. It was on the north side of Grand Rapids, in the Grand Rapids public school district (which we wanted to avoid...) and it was almost perfect. We LOVED the façade, although I loathed that white garage door. The windows were amazing, the first floor layout was perfect, and it was ON A LAKE! We loved the fireplace, and there were four bedrooms and two baths. There was main floor laundry, and did I mention it was ON A LAKE?! 

We didn't love the kitchen (it had been redone and wasn't original), the yard wasn't huge, the bedrooms were tiny (and one was actually a den...) and the next door neighbor's home wasn't anything to write home about. 

We put in an offer, but were outbid. It was the first one that got away! Here are some photos of it directly from the GRAR website


Mother's Days 2012, we did a drive by of the second house we offered on. This one too, was on a lake and it was another amazing property. We LOVED the front of this one more than the previous home, and the back of this one was simply spectacular.

Tons and tons of natural light poured in from all windows, and the exterior brick on this one was stunning. The interior was sad including an awful little kitchen, which I'd want to re-do right away, and too much living space, which I had no idea what I'd use for. It was a huge home on a beautiful lot and ON A LAKE! And the price? Well, the price was too much for us since there was a lot of work we would need to do.

We put in an offer, they were "offended by it", and refused to counter. So, we walked away and you know what? It finally sold almost a year after they put it up for sale, for only $5,000 more than our offer. This is probably the one we are most upset we didn't get! Here are some photos of it...


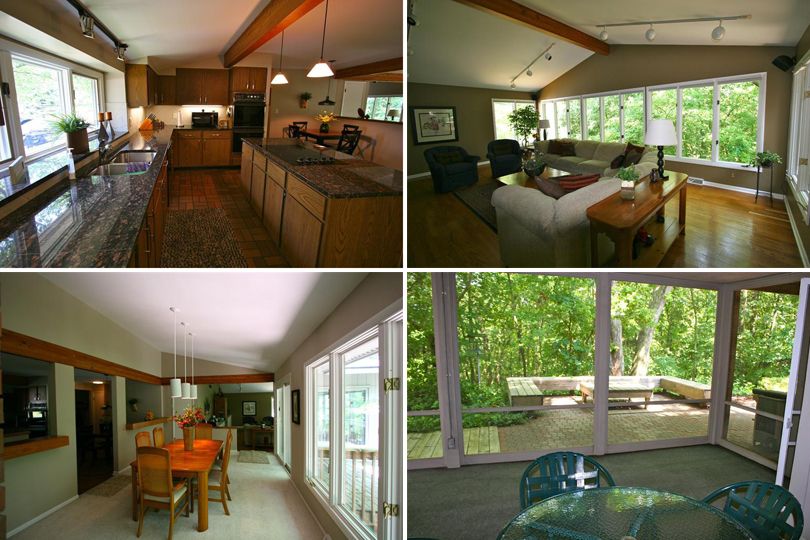
So after these two lake homes got away, we found one on the north side of Grand Rapids in a cute neighborhood. The lot was awesome - the whole back yard was shaded and had a great outdoor living space. We loved the layout and there were four bedrooms and four bathrooms! The kitchen layout was pretty perfect, and the dining room was one of my favorites we had seen.

We put and offer in and were outbid. Again. Wah, wah.


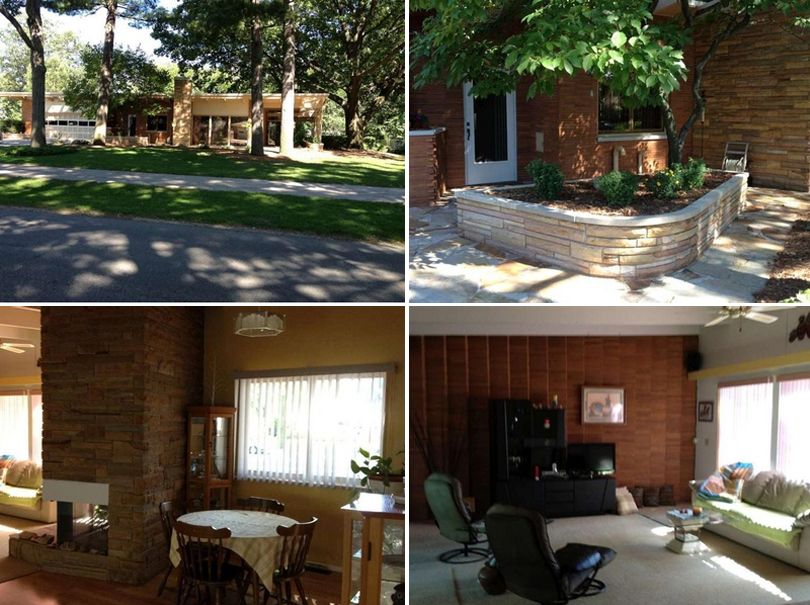
And here's the final house we looked at before finding "the one". It's in Spring Lake and was pretty amazing. It's located on a private drive with other MCM's. We loved the neighborhood. We loved the lot and the yard. We loved the outside.

But the inside? Well, it was SO huge, we had no idea how we would pay the gas bill! Seriously, three living areas on the first floor? Awesome, but not what we were looking for. At all. Moving right along - here is the only photo I have. The gorgeous outside...with amazing yard!


And the one we landed on? Well, we think it's pretty darn perfect, especially after spending the last almost-nine-months making it our own.

Our new house is small in comparison to many of these, but it had almost everything we were looking for. We landed in a great school district, we have a half acre lot, we will have one big living space when the renovations are done, and there is a two-stall attached garage.

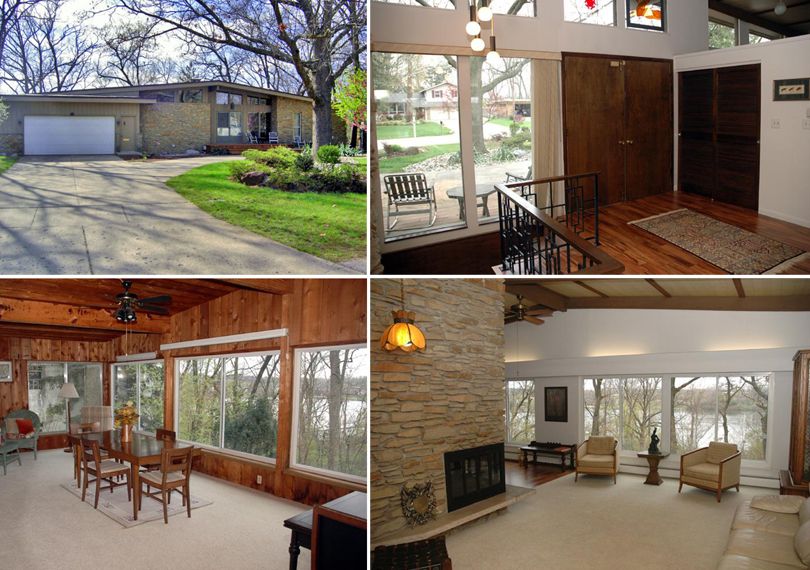
Just for fun, I wanted to share the photos from the original listing...

July 11, 2013

Transforming the Basement into Useable Space

Welcome to the basement. When we bought the home, it wasn't much of a spot you'd want to hang out. Clad in soft-but-bright yellow paint, the cinder block basement was anything but cozy.

Because the upstairs is a modest 1600 sq. ft., we had plans to finish the basement when doing the initial renovation, so we'd have another living area, and a place to hang out other than the more formal living area upstairs.

We started with this... 
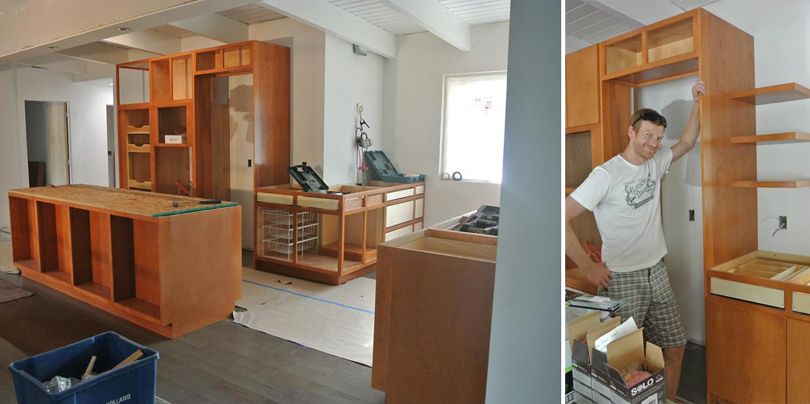
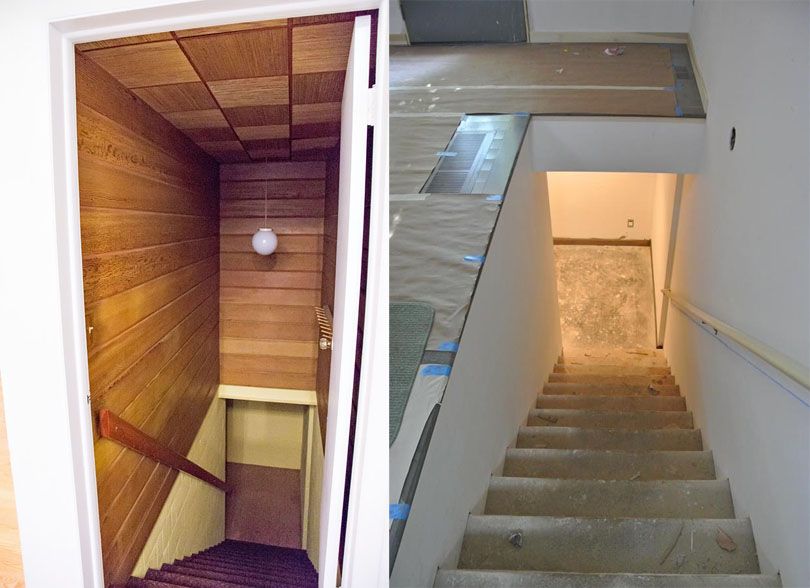
While I LOVED the wood on the walls and ceiling, plus possibly one of the only original light fixtures in the entire home, the walls surrounding the stairway made it feel like you were headed to a dungeon.

There is absolutely no daylight coming into the basement, so taking down the walls and opening them up to the upstairs, makes it flow better.

At the bottom of the stairs, there is a little nook, and then you head into the rest of the area... 
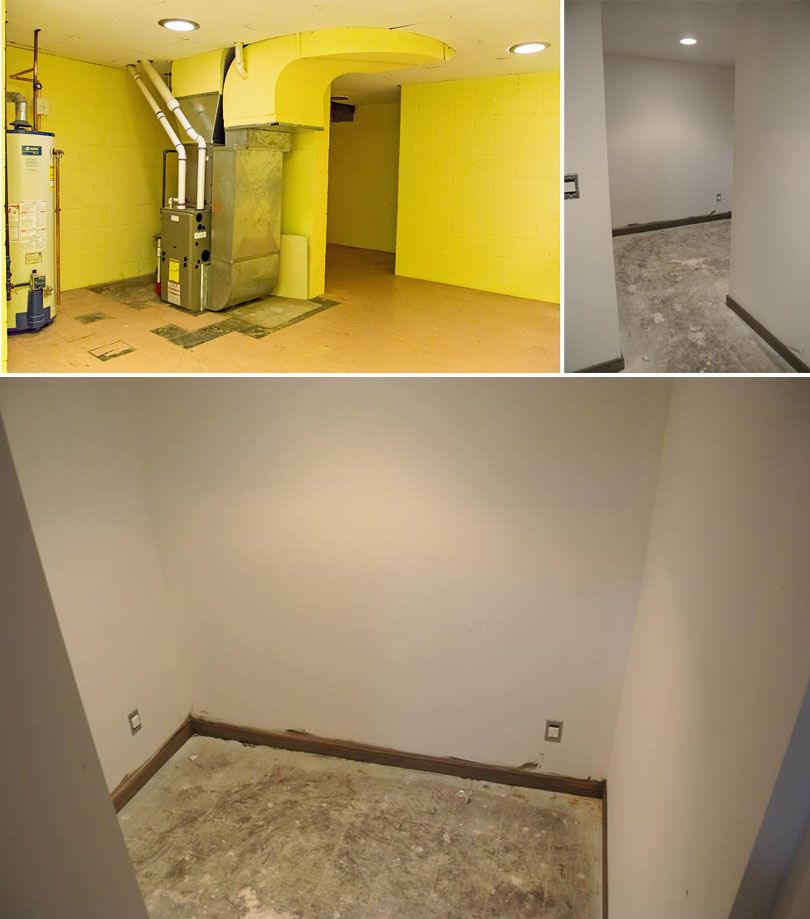
Here's a look at the nook - the top left photo shows the mechanical area on the left of the image, and the nook beyond that. The image on the top right shows looking into the nook now, and the bottom image shows the nook from the bottom of the stairs.

It's large enough to hold a little white buffet we picked up months ago. I plan to store our board games inside, and display family mementos and photos here. There is also plans for one giant photo going on the wall right over it. Since there is a lack of wall space upstairs, I've decided the downstairs will be the place where we can display family items easily. 
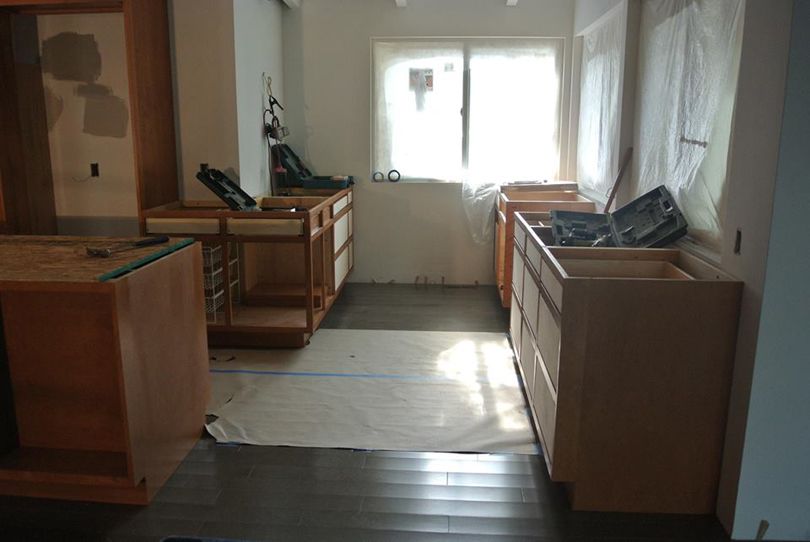
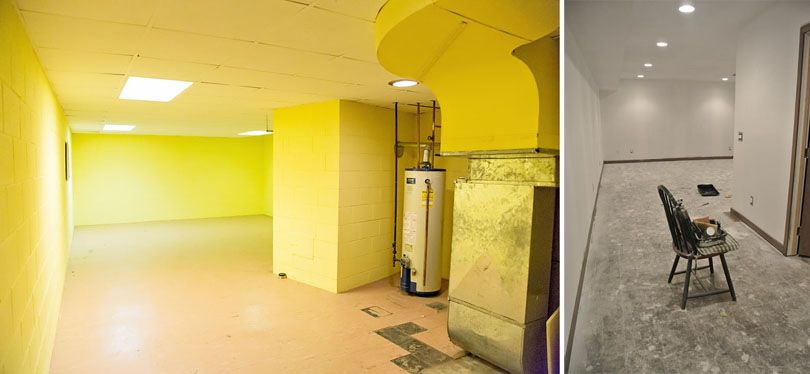
This is looking the other way, past the mechanical area (which is now an enclosed room), and into the living area of the basement. We plan to put all of our current living room furniture down here - our sofa, chair & ottoman, our media center, and our television.

There are also grand plans to have this be toy-central. We would have loved to build in shelves & closets down here for toys, etc., but the budget didn't allow us to do that this time around. Also, I had no idea how furniture was going to be placed, so didn't want to commit to that before we've actually used the space. In time, we may find ourselves adding to this area. For now, it will be a nice, open playroom!  
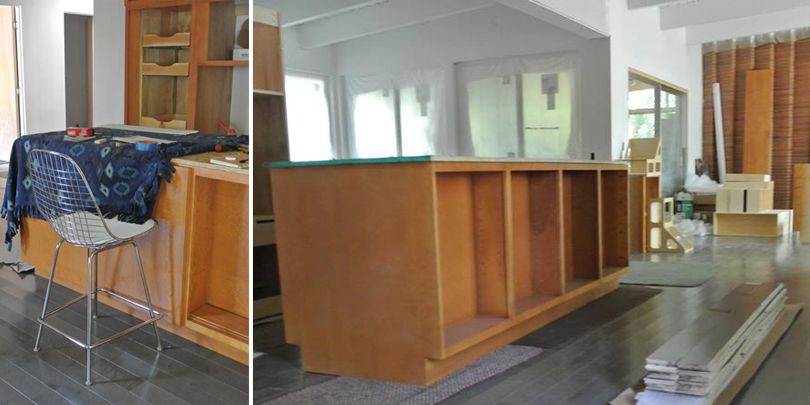
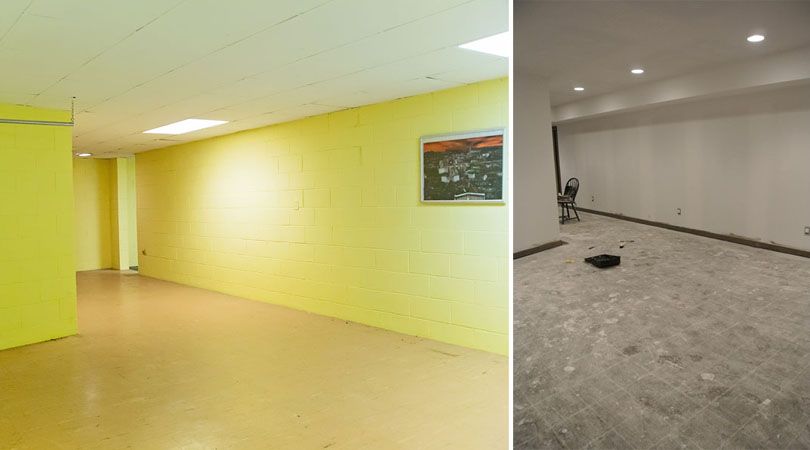
And here's looking back toward the stairs. It's quite a long room, and we're very happy with the drywall and lighting. Our painter has already stained the woodwork, and I'm very happy with everything so far!

July 03, 2013

The Outdoor Planters Get a Small Makeover

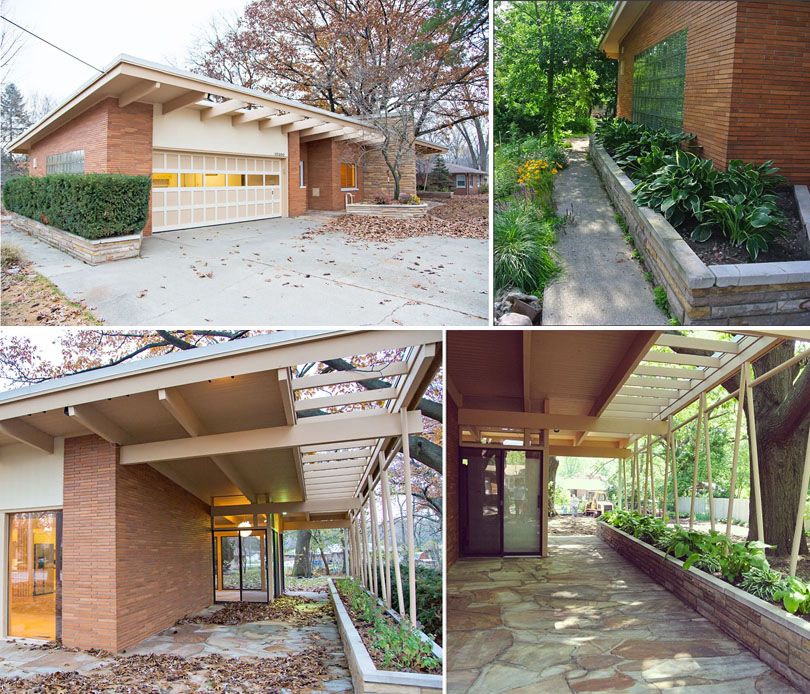
By the size of the overgrown shurbs, we can assume they were part of the original landscaping after completion of the house in 1959. On the northside of the house (top photos), they actually had the shrubs inside the planter, which, after years and years of them growing larger, put some stress on the stone and make it bow out a bit. My dad gifted us some of his time to us last Fall and spent hours upon hours of digging these out for us, roots and all.

Greg recently moved a bunch of hostas around to make way for grass in the yard, and I asked him to replant some of the hostas in here. Yes, I know they will continue to get larger as well, but at least they are easier to maintain (split, as needed) than shrubs! I love the look of this, and the easy-to-maintain aspect of this as well.

The bottom photos are of the largest patio area, and the southside planer. This had sedum in it when we moved in, and the giant, overgrown shrubs were planted to the direct south of the planter. When we started cleaning up leaves, we found so much debris & trash under them, we knew they had to go.

Lo and behold, our yard had enough hostas to plant in this planter too - it's the width of the entire house, so pretty big, and I LOVE the look of this. Again, easy-to-maintain, and very natural for this part of the U.S.A.

Grass is coming this fall - we missed our opportunity to plant before summer, and since we don't have underground sprinkling, feared it wouldn't grow well anyway. Now we're the neighbors with a bunch of dirt for a lawn; hey, at least we don't have to mow it! HA!

MCM Dining Room Progress

One thing we wanted in our next home was a dining room. In our current house, we have an eat-in kitchen, and while it has worked fine for the past eight years, we've never been able to have people over for dinner easily.

In the summertime, we can easily sit outside, but if it rains, we need to reschedule since our 30" round dining room table isn't big enough for more than three people.

While an actual dining "room" isn't what we ended up with, we do have a dedicated dining area. I wouldn't call it a room since there are only two actual walls, a third, partial wall made up of the fireplace, and the rest is open to the kitchen.

Let me try to explain... 
You may remember this image I shared when I talked about our secondhand finds back in January. We picked this dining room set up last summer at an estate sale for a steal. It's shown here with both leaves in the table, but we plan to keep it set up in the smaller position.

This is the dining area in a pretty raw state - we had taken out the wall already and you can still see that icky little bathroom by the front door. You also see the terrible subfloor we actually ended up replacing so it was level for the new floors.

I have plans to recover the dining room chairs - I'm thinking orange or a bold lime green; I may wait until we live there to tackle this project. The wood on both the table and chairs is is pretty good shape, and we don't have plans to refinish at this point.


The photo on the left shows exactly how the dining area looked the day we closed. That wall on the right is completely gone and you see the front door as in the photo on the right. It didn't make sense to us to have this area walled-in, and since it was actually added after the original house was built, we didn't feel terrible for taking it down.

And instead of a bathroom by the front door, we now have a little area for visitors to take off shoes & hang a coat. Much more usable space for us, as that tiny, gross bathroom had to go!

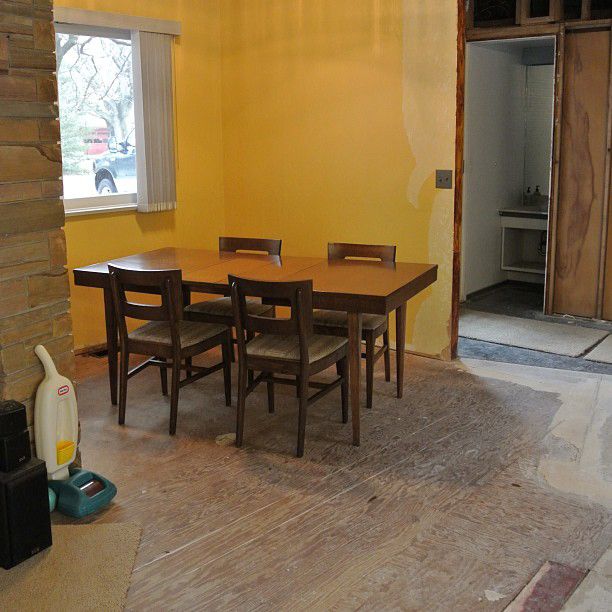
And the icing on the dining area cake? This Orla Kiely wallpaper that will be installed in the coming weeks. I knew I wanted to incorporate wallpaper into this house, but had no where to put it. I kept thinking it should be in our bedroom, but couldn't find anything I absolutely loved for in there, plus I wanted it to be a focal point, and not hidden away in our bedroom.

I started looking locally for wallpaper, but nothing seemed retro enough for the house. I finally came across this pattern and couldn't get it out of my head! Greg didn't hate it, and that meant I had better  get it before he changed his mind.

A couple of searches, and I realized they didn't sell this pattern in the U.S.A., so ended up having it imported from John Lewis in the U.K. for $33! I was shocked on the low cost to have them send this UPS overnight to me - icing on the cake, I tell ya!

So, this crazy-awesome pattern full of color and retro-goodness, will be on both walls in our dining room area. The little wall in there is only 42" wide, and the larger one is just shy of 9' wide...so, very little space to actually hang wallpaper, which made this the most affordable spot to put this!

And in case you've forgotten about our equally awesome, retro-inspired light, check out the lighting post I did back in March.

Kitchen Appliances for our MCM Renovation

Appliances for this home were important to us, as we were going for a clean look, but sticking to a budget was also high on our list. Imagine our surprise when we found four of the seven kitchen appliances we needed secondhand!

Can you believe that?! Some of my best Craig's List finds of all time! Here's a the scoop on what appliances will be going into our kitchen...


A wall oven was an easy choice; we love the idea of it being more eye level than a traditional range. It also seems that many original MCM kitchens have a wall oven and separate cook top. After being disappointed in the look of many wall ovens at the big-box stores, I started looking at the IKEA wall oven/microwave options.

I loved the look of the NUTID microwave/oven combo, and it was a heckova lot cheaper than the Whirlpool version I had found....and the kicker? Whirlpool actually makes the IKEA appliances. I brought Greg to IKEA one rainy afternoon, and after chatting with another customer in the faucet department, I showed her what we were buying.

Come to find out, she had a friend selling the set. WHAT?! Are you kidding me?

Sure enough, her friend had purchased a traditional home in the 'burbs of Detroit, and hated the set because it was too "modern" for her liking. We drove to this random woman's home and bought it from her. Saved $1000+ right off the bat. Talk about being in the right place/having a conversation with the right woman at the right time.

The perfect cook top was a bit harder to find. We were looking for one with a very straight grid, and the less fussy, the better. We wanted one with stainless knobs, and actually ordered a Maytag one we liked better than this one, but were informed it was no longer being manufactured. We ended up with the Whirlpool one above, with black knobs, which will be fine. We went for the 30" option since the space we decided to put it in wasn't the largest. Super simple cook top from a lower-end manufacturer = affordable!

And of course, since we don't have a microwave above the cook top, we needed a vent. The previous owners didn't have one, and the house smelled like various foods, so we knew this was important to keep the house smelling free of bacon, etc! We went with a super simple Broan version and are excited about both the form & function this hood will provide for our cook top area.


We had been looking at this fridge for years. It's the one on our "dream wish list", as "if we won the lotto, we want this fridge for our house"! We actually fell in love with the idea of a glass door fridge years ago, but it made no sense to put it in our current home. We also love the fact this fridge is literally 24" deep - the same depth as cabinets, meaning this will sit flush and not stick out into our walkway between the cabinets and the island.

Have I mentioned Greg is the king of Craig's List shopping? Never buys anything, but the guy LOVES to search Craig's List for just about anything - mostly boats and trucks, but also MCM furniture finds and oddities.

Imagine my utter surprise when OUR DREAM FRIDGE popped up on Craig's List. From what we understand, someone had purchased it, and it didn't end up fitting in their already-constructed kitchen, so it was brand new, in the box, and 1/8 of the cost - this guy needed to unload it. Of course, we had to drive a few hours with a truck & trailer to pick it up, but that was fine with us - we've driven all over the state for Craig's List finds!

It sat on Craig's List for a month. We watched the price drop, and when we thought, "We can't miss out on this deal!" and "Can this be the real?", we emailed him and arranged to check it out. We have had it hanging out in our new garage since the day we closed; it's the first thing we bought for the house and actually picked it up a couple of weeks before closing!

Yes, yes, I realize the fridge will always need to be organized, which is fine with me, since that's how we live anyway. I love the idea that I can see everything we have in the fridge without opening the door. Perfect to save a bit of energy by not opening the door every time you want to peek at what's available for a snack or drink.


And the final two appliances will be "hidden" with cabinet-matching panels and pulls that will seamlessly flow with the rest of the cabinets they are surrounded by. The first is the dishwasher. I actually found this dishwasher listed on Craig's List, but I wasn't quick enough this time - someone bought it before I could pick it up! And Greg didn't LOVE the idea of a used dishwasher, so it worked out okay.

We decided on this one because we have it at our current home and love it. While I LOVED the idea of the two-drawer dishwasher by Fisher & Paykel, this was much more affordable and I LOVE the idea it won't stick out like a sore thumb in our bank of cabinets.

The second is a freezer and ice maker. Since our fridge is literally a fridge-only, we needed someplace to store the small selection of frozen goods we consume. We're not huge freezer people - so having a huge freezer wasn't important to us, but I do prefer ice in my drinks, and we do freeze the occasional item. This was also a secondhand purchase from the guy with the fridge - he ended up getting a fridge WITH a freezer, so didn't need this item either. LUCKY US, we saved 75%!

So, there you have it - our kitchen appliance lineup. It's a jumbo mix of brands, and also a mix of wood panels and stainless, plus a mirror finish on the oven & microwave. We are anxious to see everything when it gets installed; we hope we love it in real life! Although, I suppose if we hated it, we could re-sell things on Craig's List :)

July 01, 2013

Kitchen Cabinet Progress


Remember those naked kitchen cabinets in our builder's workshop? Well, they are now stained and inside the house! Last Monday, Greg was out at the house working on the lawn, and texted me to tell me that our builder brought the cabinets over. By Wednesday, they were in place and ready for counter top templates. WHOA! Although it seemed like it would NEVER get here, we finally are moving along in the kitchen area.

We are still waiting on all of the doors & drawer fronts, and of course, haven't yet selected our hardware, but it's looking more and more like a house everyday!

I was a bit nervous on the color of the wood, because it looks really orange in photos, but when I saw it in person, I knew it was perfect. The cabinets are birch and we stained them with a custom color blend from RepcoLite. Because we are putting faux wood laminate on the bathroom counters, we picked out the color we liked and had the stain match that. It was "Taj Teak" and I think RepcoLite did a great job!

With the home being built in the 50's, I have to imagine this is what the original kitchen cabinet style would have looked; unfortunately when we bought it, we inherited a white laminate, 1990's version. Wah wah wah. While we've updated the layout to fit with our 2013 lifestyle, we wanted the style of the cabinets to reflect that of the house, not of 2013.


This is the view from inside the front door. The kitchen is literally the center of the house. Some of the cabinet fronts are on already, but we're still waiting on a lot more!

Let me try to explain what will eventually be here... You can see the pantry with the drawers that pull out (I think we are going to get at least one more drawer in here - seems like a lot of wasted space to me!) on the left. Then the IKEA wall oven & microwave (which we bought secondhand!) will go in the middle of the wall, and on the right there is a spot for our fridge (which we found on Craig's List!). At the end of the wall, before you turn the corner, I added three little floating shelves for everyday things like glasses, small bowls, and am reserving the top shelf for something cute, since I can't really reach it anyway.

In front of the wall, you see the island. There are a couple of cabinet doors on already, but we're still missing a couple. These doors on the back of the island will be sort of hidden under the counter top that hangs off the island to form the breakfast bar. They are very shallow cupboards that will store rarely used items such as wine glasses, etc.


Here's the view from the living room. The photo of the left is from the first couple of days. The photo on the right with Greg posing with the floating shelves in a couple of days newer. You can tell because we have a few more cabinet fronts on!


Here is the spot where the former kitchen was. We didn't move any walls around in this area, just took down a partial wall and got rid of an office area to accommodate more kitchen. This should work very, very well for our family. We look forward to lots of party-hosting here!


Greg got one of our bar stools out to see how much the counter should hang over to create a good size breakfast bar. He met the guy at the house this morning to determine that! I look forward to seeing what was decided.

And there you have it - our kitchen "in progress"!

Search

Archive

Sharing makes the blog world go 'round, but credit is essential. Content from the MidModMich blog may be partially reproduced, however proper credit and an active link must accompany any reproduced materials.

©2014-2021 True Home Restorations. All Rights Reserved.

True Home Restorations
PO Box 552
Grand Haven, MI 49417
My photo
Grand Haven, Michigan, United States