
Living, Dining & Kitchen Floor Plans
When we initially walked through the house, there were many changes that were obvious - take down the wall that was added on in the 70's, take out the "open" office that was the first thing you saw when you walked in the door, and make the ridiculously large bathroom into two normal sized baths, one being a master closet & bathroom.
The more time we've spent there doing demolition, the more projects we've come up with, and the more we've decided how we *think* we are going to use the space. It's actually quite fun spending weekends there dreaming of how we will eventually use our space, while taking down double layers of drywall (not joking...).
You've seen the before tour, so now I share with you the "before construction plans". I am sure it will not turn out like this 100%, but it's our starting point. And if you've never used FloorPlanner.com, what a fun little tool to create rooms to scale! You will need to use your imagination a bit, but here goes...

This is the layout we have decided on. The living room is on the left (which is the south side of the house) will be where we hang out. There is a fabulous sectional sofa & matching (giant!) ottoman already in place (a Black Friday deal we couldn't pass up!), and I actually picked up some lampshades that I really like last week. Other than the sectional, we won't need much furniture - it's going to be perfect.
The dining room is right near the front door, and the fireplace is between both of these spaces. We picked up our table & chairs set at an estate sale and it fits in this space perfectly - we are SO excited to be able to have people over for dinner now. Just to the right of the front door is currently a tiny bathroom. We are taking it out completely for a little entry area, since there isn't one already, and then opening up the staircase to make it seem bigger. Lots of walls coming down for this, and I'm excited to see how much larger the space feels!
The kitchen is behind the dining room, and we've decided on this layout - tons of counter space, and an island for eating, conversation and meal prep. You will notice we are going to do two sinks - one on the long counter and another in the island - I think this is my favorite add-on idea.
Okay, so this may make more sense to see it in 3-D. My FloorPlanner skills are not perfect, but here's my best shot at this point...
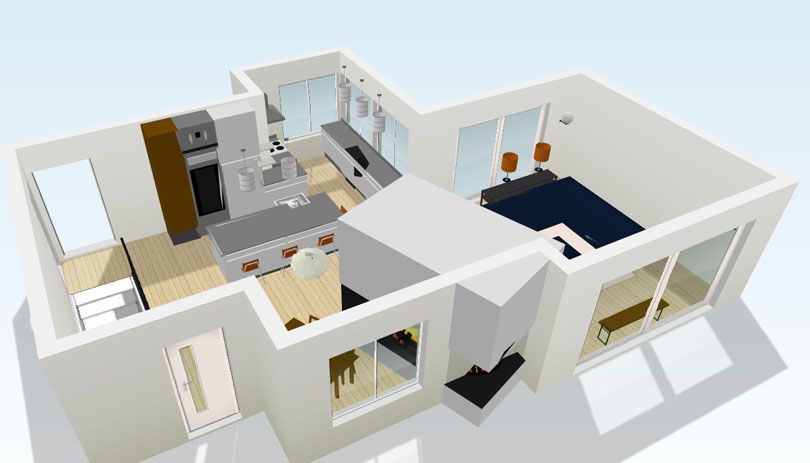
Here's the front of the house from the driveway. You walk in the front door (I did not put the garage on this...) and you're standing near the dining room, and almost in the kitchen. There's a pantry (tall, brown cupboard), a wall microwave/oven (this is just the oven stretched...they didn't have what I wanted!), and a fridge. The island sits in front of that, but doesn't begin until the oven starts, so there's a bit more walking space. You will also note the open staircase that goes to the basement. I LOVE THIS!

Here is the view from the back. You see the front door, dining room area, little entry area that used to be the tiny bathroom, and the open stairs that lead you down. You can see the large windows in the living room, and all the counter space in the kitchen. That large thing in the middle is the fireplace - ours is stone, but I couldn't figure out how to change it.

And here you have the southeast corner. You can see the island better, as well as the little corner that houses the cooktop and hood. We added some floating shelves over an 18" cupboard to open that corner up a bit. Still super excited about having an island, and our fireplace isn't this crazy looking, but it was the one FloorPlanner had available!

0 thoughts:
Post a Comment